Kostenloses Tutorial: Himmlische Osterdeko (Teil 1) / Free tutorial: A different kind of Easter decoration (part 1)


Die Zeit der Ostersträuße hat ja nun begonnen und wer keine Lust auf die üblichen Ostereier und Häschen hat – dem gefällt vielleicht die himmlische RevoluzZza-Osterdeko mit Wölkchen und Vögelein :-)
Most of the people already started to decorate their homes with pretty Easter stuff: cute bunnies, little chicken and Easter eggs. But I don’t feel like bunnies and Easter eggs right now and so I want to show you how to sew clouds and little birds for your Easter flower bouquet.
Lets’s geht started:
PDF-Vorlage runterladen – Download the PDF-pattern
(Die verwendeten Bio-Stoffe sind übrigens bei Volksfaden zu haben – der Filz ist pures Recycling aus PET-Flaschen und gibt’s bei der Quiltzauberei zu kaufen)
—————————————————————————————————————————————————–
1. Wir starten mit der Wolke- schneidet das Wölkchen aus und steckt es mit Nadeln auf den von Euch gewählten Stoff, den ihr gleich doppelt nehmt – so ist dann die Vorder- und die Rückseite auch garantiert gleich groß. Ausschneiden (Nahtzugabe ist nicht nötig, habe ich schon eingerechet).
–
Start with the cloud: Cut it out and pin it on the fabric you like and cut along the pattern – put the fabric double so the front and the back will be even. No additional seam allowance necessary.

—————————————————————————————————————————————————–
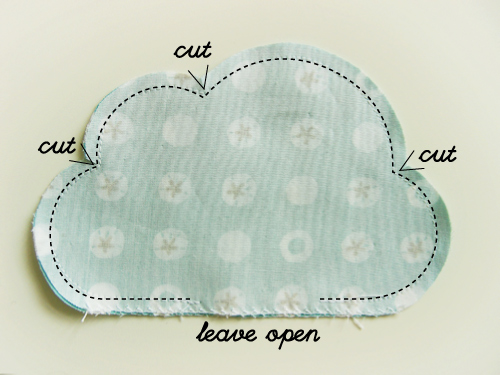
2. An der unteren Seite der Wolke wird sowohl die Vorder- als auch die Rückseite des Stoffes mit einer Zickzack-Naht versäubert, weil wir die Wolke hier später sauber mit einem sogenannten Matratzenstich mit der Hand verschließen.
–
Later we will close the cloud by hand with the so called mattress stitch – and to do this we have to spare a part that we won’t sew together with the machine. This part you have to neaten on the front and the backside with a zigzag stitch.

—————————————————————————————————————————————————–
3. Jetzt Vorder- und Rückseite des zugeschnittenen Stoffes zusammenstecken mit Nadeln und mit einem Geradstich einmal rundherum nähen – die Öffnung unten zum Ausstülpen und Stopfen offen lassen.
–
Pin the front and the back of your cloud fabric together (inside out of course) and sew it together with a straight stitch. Don’t forget the leave the neatened space open.

—————————————————————————————————————————————————–
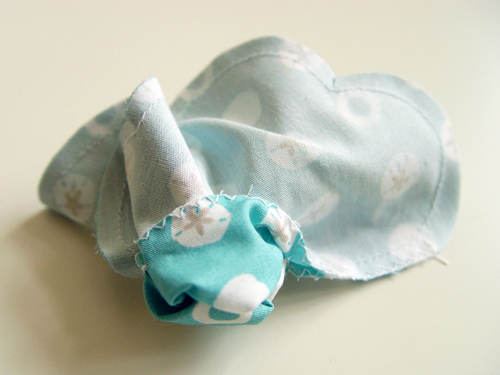
4. Wenden.
–
Turn inside out.

—————————————————————————————————————————————————–
5. Die gewendete Wolke wird jetzt mit Füllwatte befüllt. Ich nehme hierfür am liebsten ein asiatisches Eßstäbchen – ganz nach Bedarf benutze ich die schmalere oder das breitere Ende.
–
Fill the cloud will wadding. I usually to do this with a chopstick.

—————————————————————————————————————————————————–
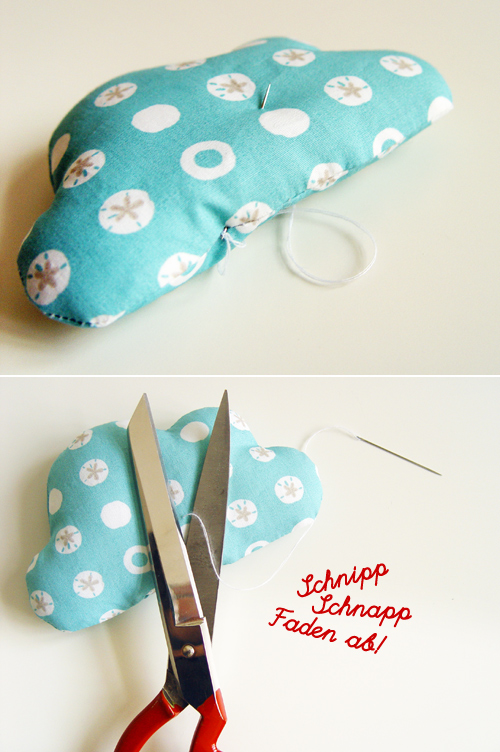
6. Nun wird unser Wölkchen noch mit dem Matratzenstich verschlossen.
–
Close the cloud with the mattress stitch.

Dabei den Faden nie zu sehr ziehen und alles schön glatt zusammennähen.
–
Do it nice and easy and don’t pull the thread too strong.

So sollte es dann aussehen:
–
This is how it should look like:
—————————————————————————————————————————————————–
7. Zum Schluß nochmal die Nadel nochmal tief ins Wölkchen stechen, austretenden Faden abschnippeln – fertig ist das Wölkchen.
–
Finally you stick the needle a last time deep into your cloud, pull it out and cut the thread. And that’s it already!

Ich hoffe, Ihr habt Spaß an dem Tutorial und näht viele, viele kleine Wölkchen.
Das Vögelchen-Tutorial gibt’s morgen.
Und nochwas: Vor langer Zeit hatte ich mal eine RevoluzZza-flickr-Gruppe ins Leben gerufen, in der Ihr die wunderbaren Wesen posten könnt, die Ihr nach RevoluzZza-Anleitungen genäht habt. Und es ist mir wirklich peinlich, dass ich die Gruppe so lange vernachlässigt habe – denn eigentlich finde ich es immer super spannend und anregend, Eure Interpretationen der RevoluzZza-Wesen zu sehen. Deshalb möchte ich Euch ermutigen, Fotos von Euren RevoluzZza-Kreationen hier zu posten!
–
I hope you enjoy sewing many, many cute clouds – I will publish the bird tutorial tomorrow.
And I like to revive something I am a bit ashamed I forgot it over such a long time: the RevoluzZza group on flickr where users showed their RevoluzZza creations. I totally love to see the results of my tutorials and I’m amazed concerning the wonderful and so very different interpretations of the RevoluzZza creatures, that I want to encourage you to show and share your work here!


Merci pour ce tutoriel… C’est une très belle idée pour ce début de printemps.
♥danke♥
liebe grüße
andrea
Das sieht ja zuckersüße aus. Tolle Idee!! Werde ich auf jeden Fall nachmachen (passt ja irgendwie auch das ganze Jahr über).
Sonnige Grüße,
Sarah
Amo suas dicas!!
parabéns pelo bom gosto em criatividade
bjs até mais!!!
[…] Comments Sarah on Kostenloses Tutorial: Himmlische Osterdeko (Teil 1) / Free tutorial: A different kind of Easter deco…andrea on Kostenloses Tutorial: Himmlische Osterdeko (Teil 1) / Free tutorial: A different kind of […]
Toller Blog:-) Tolle Anleitungen:-))Morgen werden auch bei uns ein paar Vögel zum Leben erweckt:-)DANKE