Free Tutorial: RevoluzZzionary Flower Brooch / RevoluzZzionäre Blumen-Brosche
… I guess there is no person in the world who doesn’t like flowers. They are given to beloved ones and say „I love you“, they are a „thank you“-gift, they say „Happy Birthday“ and we love to have them around just because they are so perfectly beautiful and make us happy. And we use them to say good-bye. I guess each of us has her/his own reasons to like flowers – and today I want to show you how to make one that will always bloom.
—
Sehr wahrscheinlich gibt es Niemanden auf dieser Erde, der Blumen nicht mag. Wir schenken sie unserer großen Liebe um ihr/ihm „Ich liebe Dich“ zu sagen, wir bedanken uns mit Blumen, wir schenken sie zum Geburtstag und wir haben sie einfach gerne um uns, weil sie so perfekt schön sind. Und wir sagen „Leb wohl“ mit Blumen. Jeder hat seine eigenen Gründe, Blumen zu mögen – und heute zeige ich Euch, wie Ihr eine Blume nähen könnt, die niemals verblüht.
—
Download the pattern, print it, cut it out, pin it on some nice felt (I’m lucky that I had a little piece of felt with funny dots on it left) and cut out all of the pieces.
—
Lade das Schnittmuster herunter, schneide es aus, stecke es mit ein, zwei Nadeln auf etwas Filz (glücklicherweise habe ich noch ein Reststück von einem hübschen gepunkteten Filz) und schneidet alles aus.

You only need one piece for the flower stem – but you need two pieces for the blossom: A front and a back-side as you will fill that with some wadding later.
—
Für den Stengel benötigt Ihr nur ein Stück, die Blüte hat eine Vorder- und Rückseite, die Ihr gleichzeitig ausschneidet, damit sie später exakt aufeinander passen.

Now decorate the stem and the leave by sewing with a white thread the shape of the stem and the leave – it’s really simple: Just use a straight stitch.
—
Der Stengel und das Blatt wird akzentuiert, indem wir mit einem weißen Faden und einem Geradstich die Konturen nachnähen

Knot the threads on the backside and hide them with a needle inside of the felt.
—
Die Fäden werden auf der Rückseite verknotet und die Enden im Filz versteckt.
 Cut the thread.
—
Faden abschneiden.
 Done.
Done.
—
Fertig.

The blossom: Put the two blossom pieces together, the stem between the pieces, pin the blossom together…
—
Die Blüte: Legt die beiden Teile passend aufeinander, steckt den Stengel dazwischen, fixiert das Ganze mit ein, zwei Nadeln…

… and sew the blossom together with a straight stitch. Spare a part that you won’t sew together.
—
Und näht sie zusammen mit einem Geradstich. Lasst an der Seite eine Öffnung.

Before you fill the blossom with wadding, take a thread and a needle, make a knot into the thread and place it at the back of your blossom by sewing it from the inside to the outside. Leave it there. You will use this a bit later to fix the pin.
—
Bevor wir die Blüte mit etwas Watte füllen, ziehen wir auf der Rückseite der Blume schon einen Faden ein, mit dem wir später die Anstecknadel festnähen.

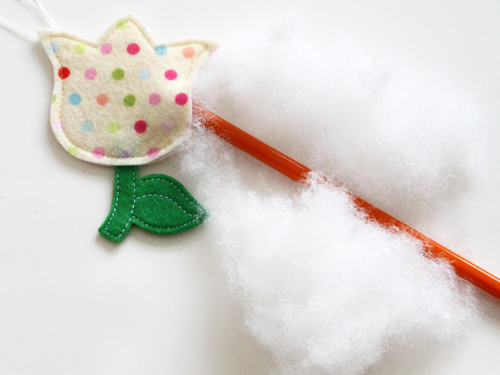
And now: Fill the flower with some wadding. I like to use an Asian shop stick to do that.
—
Nun die Blüte mit etwas Füllwatte füllen, ich nehme dafür gerne ein asiatisches Eßstäbchen.
Close the blossom by sewing together the left open space with your machine. Hide the threads like you did before.
And now fix the pin by hand sewing.
—
Jetzt wird die Öffnung mit der Nähmaschine zugenäht, die Fadenenden auf der Rückseite der Blume vernotet und die Fadenenden in der Blume versteckt.
Der Anstecker wird nun mit der Hand festgenäht.

And wear your flower brooch with proud and happiness!
—
Das war’s – tragt Eure Blumenbrosche mit Stolz und Freude!

I’m wearing mine as a memory flower. One of the most important people in my life passed away a short time ago. And to me flowers are the most beautiful way to think of a beloved one who is not around anymore – looking at the flowers at my balkony in front of my working place makes me think that we have to enjoy the good things while they are around. You never know when they will be gone.
Liebe Suse, danke für das niedliche Tutorial – eine sehr schöne Idee, sie als Andenken an einen geliebten Menschen zu tragen, mein Beileid.
Liebe Grüße, Kati
That is a lovely idea thanks for sharing, x
Vielen Dank für das Tutorial! Es ist super!! Ich komme aus Argentinien und habe deinen Web gefunden. Es tut mir leid dass ich das Magazine nicht verkaufen kann.
Sorry for my deutsch! I´ve only been studying it for a while now.
Thanks again. I`ve made one for my mum!
Vielen Dank für das Tutorial! Es ist super!! Ich komme aus Argentinien und habe deinen Web gefunden. Es tut mir leid dass ich das Magazine nicht verkaufen kann.
Sorry for my deutsch! I´ve only been studying it for a while now.
Thanks again. I`ve made one for my mum!I hope she likes it!
[…] geht es hier. Mit anderen teilen:Geschrieben von: Suse RevoluzZza am 23. August 2011. keine […]
[…] own. We love the spotted felt, but you can use any patterned felt, or a plain-coloured one instead. Click here to see the instructions. Share this article or issue […]
Vielen Dank für deine Anleitung! Mein Blümelein ist zwar bei weitem nicht so perfekt wie deins…..aber ich liebe es!!! :-)
http://linababedierste.blogspot.de/2012/03/diese.html
Liebe Grüße
Lina