Let’s Sew… a RevoluzZzionary Easter Bunny


Last year I uploaded that pattern to create a simple Easter Bunny – and many of you made so wonderful and amazing Easter Bunnies! Some made them out of paper, many sewed really cute bunnies. And so I decided to take the bunny from last year (only made a few modifications) and sew two different versions by using the same pattern: a very simple version and another one with arms and legs and a more detailed face. The simple version is really very easy – absolutely perfect for beginners. And the other version is only a tiny little bit more fiddly – but not really difficult.
And hey, next weekend its already Easter – so hurry up :-)
First download the >>> RevoluzZzionary Easter Bunny pattern and print it – cut it out, chose your fabric, pin the pattern on the fabric and cut out:

—
Simple Easter Bunny:
When you want to stitch the face of your bunny on a fabric it’s good to iron some interfacing on the inner side of the fabric:

Now make your little bunny a unique face – maybe some cute cheeks, maybe Miffy-like pout. Whatever your like. And you could give your bunny a heart now :-)

Before you sew the front and back of your bunny together, you serge the bottom of the bunny – where you will close it later with a blind stitch. And then: pin the front and the back together – of course the outside in. Sew the parts together and cut the parts between the ears and on the neck. Then serge everything:

And now the most exciting part comes: Turn your bunny inside out!

That’s it! Now you fill your bunny with doll wadding, use a shop stick for the ears and close your new friend with a blind stitch.
This cute bunny is perfect for Easter decoration – but it’s also perfect as a toy for babies. It’s perfect for little hands to grab it. And it gets even more exciting for babies when you put a rattle in the bunny tummy.
When I started sewing for kids about 3 years ago – my first best sellers were pretty simple bunnies (I called them Ladus) which were resembling this simple bunny. And I sewed to ribbons between the ears to tie them to a baby bed. And I filled the bunny tummy with lavender which has a very positive impact on babies. And you can even put a musical box inside this bunny and make it a wunderful and unique musical cuddly toy.
OK, that was really easy. Now try the other version.
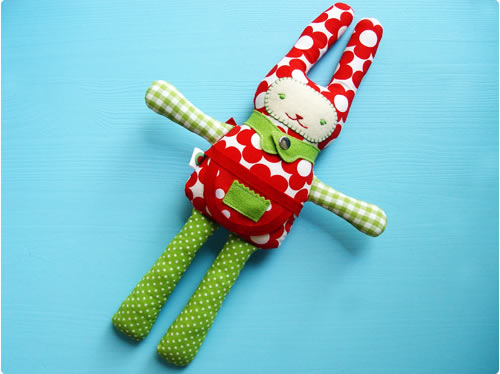
Easter Bunny Toy:
Use the same pattern as before for the body and cut the arm and legs pattern as well. If you want a felt face – cut that one too.
Sew the felt face on the bunny – of your machine doesn’t have that special quilt stitch you can as well use a zic zac stitch or whatever you like. Then stitch the cute face just the way you like it. If you don’t want a smiling mouth – the Miffy-like mouth looks also super cute on a felt face.


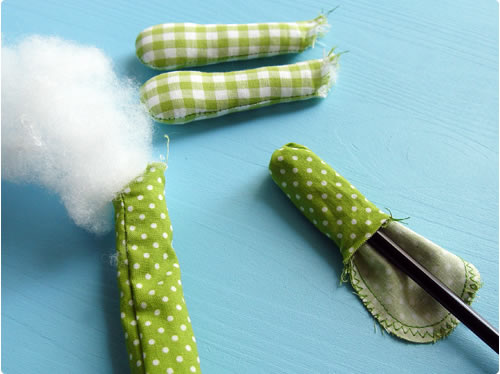
Now pin the the arms and legs outside in, sew them together, serge the edges, turn them inside out and will them with doll wadding. Use a shop stick to reach all parts of the arms and legs.


OK, now it’s getting serious :-)
Some handcrafters pin now already everything together: the front and back of the body together with the arms and the legs. That’s fine but I don’t do it that way.
First I serge the edges where I will close the body later with a blind stitch. Then I mark with a vanishing pen the points where I want my arms and legs.

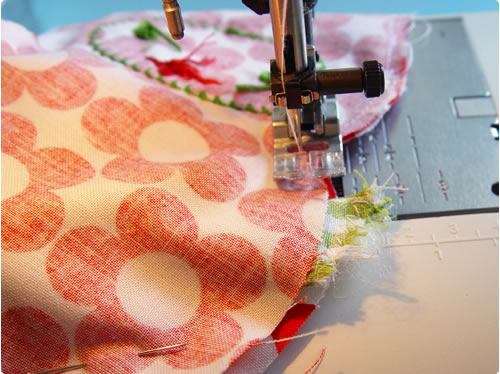
I pin front and back of the body together, insert the first arm and – start sewing. I insert the other arm short before I come to the point which I marked.


The same with the legs. Then I cut the parts between the ears and on the neck and serge the edges of the bunnie’s body with a zic zac stitch. This fixes the armes and legs additional – so brutal little kids won’t be able to amputate arms or legs from the cute bunny (well, as long as they are not TOO brutal :-) ).

Now again the exciting moment: Turning your new friend inside out.

Now you are almost finished. You only have to fill your bunny with wadding, close it with a blind stitch – and that’s it!
And when you really love your bunny – you make it some cute accessories – maybe a scarf? Or a felt collar like I did. If it’s a bunny boy, I’m sure he would like to have some nice pants. Or if it’s a bunny girl – what about a cute skirt? Or an apron? I’m sure there are many things that come to your mind :-)


And of course I would LOVE to see your RevoluzZzionary bunnies in the RevoluzZza flickr group – where I found just now the first little easter bunny (from my last year’s pattern). Super cute! :-)
[…] on over to RevolusZza for step-by-step instructions. Share this article or issue […]
[…] -Coelhos de pano […]
[…] I can imagine Ava cuddled up reading with one of these, these or these adorable […]
Utterly gorgeous!
Thanks so much for sharing
Jo :)
[…] Iepurasi de paste […]
[…] some soft toys. I googled, “How to sew an Easter bunny” & found a great blog (Revoluzzza) that showed step-by-step instructions & a free pattern. I had never made a soft toy before […]
Thanks for this adorable pattern! It was so simple and so gosh darn cute.
-Jess
Thanks for this adorable pattern! It was incredibly simple and so gosh darn cute.
-Jess
[…] fertige Katz´ (sieht man das es ein Mädel sein soll?)nach einem veränderten Schnitt von hier: blog.revoluzzza.com/2009/04/06/lets-sew-a-revoluzzzionary-easter-bunny/ Hat mir wirklich Spaß gemacht und das Geburtstagskind hat sich gefreut…. ich hätt sie fast […]
[…] Bunny Doll Plushie Pattern by Revoluzzza Related posts:Charles the Plushie by MummySamHedgehog Plushie Pattern by LollyChopsBellatrix Bat Plushie Pattern by Bit of Whimsey Dolls Categories all plushie patterns, PLUSHIE PATTERNS […]
Hello!
Thank you for wonderfull tutorial!
Thiss is my bunnies: http://polinakuts.blogspot.com/2012/09/blog-post_7.html
I hope you will like them!
[…] it’s kind of cute. I hope Layla likes playing with it. I would up using a variation of this pattern (just the body) and making my own style of ears, arms and […]
This is SO cute! I pinned it!
I would love for your to join my Link Up! :)
http://www.pluckys-secondthought.com/pluckys-link-up-and-a-giveaway/
Olá!
Escrevo para agradecer…
Estou utilizando o molde para fazer coelhinhos para os meus 3 netinhos.
Abraços!
Neusa
Adorable doll! Wonderful tutorial! And I’m amazed at how great your English is! I didn’t even know you weren’t a native until I got to the comments!
[…] my daughter last year. There is a great free tutorial and pattern for this cute little guy over at Revoluzzza. Enjoy the holiday! […]
[…] Bunny Pattern […]
[…] Martha Stewart Menswear BunnyRevoluzzza Easter Bunny […]
[…] The tutorial and pattern is available from blog.revoluzza.com […]
[…] is the original pattern. If you read Revoluzzza’s blog, you’ll find a link to several versions of these bunnies […]
[…] Mert ki ne szeretné a nyuszikat? Aki kevésbé tud varrni, de mégis el szeretné készíteni, az itt talál egy nagyon jó kis képes összefoglalót, természetesen a sablonnal […]
[…] Instead I googled bunny patterns and we stumbled upon this site. […]
[…] via blog.revoluzzza.com […]
[…] This little rabbit girl now lives in London with my granddaughter Madeleine. The pattern came from here. […]
[…] as every tot loves a new stuffed animal. If you are feeling crafty perhaps a Menswear Bunny or a Revoluzzionary Easter Bunny. Do you crochet? I’m tempted to learn to make this Amigurumi Sweet Bunny. I’m […]
[…] blog.revoluzzza.com […]
These bunnies are super cute! Love your tutorial. It’s clear and easy to follow! Thanks a lot for sharing! I featured this in my blog: http://www.plushiepatterns.com/bunny-doll-plushie-pattern-by-revoluzzza/
[…] Πριν από μερικές μέρες η βαφτιστήρα μου έγινε ενός! Της έφτιαξα λοιπόν ένα γεμιστό παιχνίδι μιας και έχω καταλάβει πόσο πολύ της αρέσει να παίζει με αυτά. Δες πως να φτιάξεις και εσύ το δικό σου γεμιστό παιχνίδι, θα χρειαστείς να κατεβάσεις και να τυπώσεις το μοτίβο που βρήκαμε στο revoluzzza.com. […]
[…] 77. Revoluzzzionary Easter Bunny […]