Kostenloses Tutorial: Kommt ein Vöglein… (Teil 2) / Free tutorial: A birdie for your Easter flower bouquet (part 2)
Ich hoffe, Ihr hattet schon viel Spaß beim Wölkchen nähen – nun der zweite Teil des Tutorials: Das Vöglein.
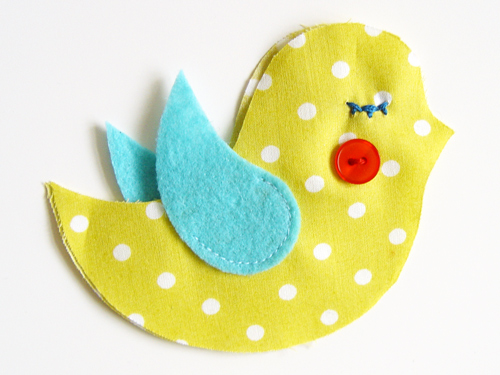
Ihr braucht ein wenig Stoff für den Körper und ein kleines bisschen Filz für die Flügel. Die roten Bäckchen könnt Ihr entweder auch aus Filz machen oder hübsche Knöpfe aufnähen.
Ich habe den selben Stoff für die Vorder- und Rückseite des Vögelchens verwendet, es sieht aber auch sehr hübsch aus, hier verschiedene Stoffe zu verwenden. Das Vöglein ist einfach ideal um Stoffreste aufzubrauchen.
Wie schon bei den Wolken: Vorlage ausdrucken, ausschneiden, auf den doppelt gelegten Stoff mit Nadeln stecken, ausschneiden (keine Nahtzugabe nötig) und los geht’s!
–
I hope you had the time to sew nice clouds already – so now get started to create a cute little bird.
You need some fabric pieces and a bit felt for the wings. And also some felt or buttons for the cheeks. I used the same fabric on the front and the back of the birdie – but it also looks great to use different ones. So the little bird is a good way to use your fabric leftovers from other projects.
Just as you did it for the clouds: Print out the pattern, cut it out, pin it on the chosen fabric, cut along the pattern – put the fabric double so the front and the back will be even. No additional seam allowance necessary.
And these are the pieces you have now to put together your bird.

Ich habe hier rote Knöpfe für die Bäckchen verwendet – Filz sieht aber auch sehr hübsch aus (s.u.).
–
I used red buttons for the cheeks – but you can as well use felt as I did here:

—————————————————————————————————————————-
Wofür auch immer Ihr Euch entscheidet – mit den Bäckchen wird begonnen und wenn diese aufgenäht sind, schaut Ihr, wo und wie Ihr die Augen platzieren wollt. Es gibt ganz viele Möglichkeiten die Augen zu gestalten. Ich habe beim roten Vogel einfach geschlossene Augen aufgestickt, das Gelbe hat klitzekleine aufgestickte Wimpern.
–
Whatever you use for birdie’s cheeks – you do it now and after the cheeks are done, you decide where to place the eyes.
There are many nice ways to stitch eyes – as you can see the red bird has very simple, closed eyes, the yellow one has some little eyelashes added.

—————————————————————————————————————————-
Aber geschlossene „Lach-Augen“ oder offene Augen sehen allesamt auch sehr schön aus. Probiert es einfach aus!
–
But open or smiling closed eyes look wonderful, too. Just try out what you like best!

—————————————————————————————————————————-
Nun werden die Flügel aufgenäht. Ich nähe sie etwas versetzt auf, so dass sie später nicht parallel sitzen – das sieht lebendiger aus.
–
Now we sew the felt wings: I like to place them on the front and the back of the bird in a way, that they are in a different angle.That looks more vivid.
—————————————————————————————————————————-
Die Flügel werden mit einem einfachen Gerad-Stich aufgenäht, jeweils mit etwas Abstand zum Stoffrand, denn später müssen die Flügel umklappen können, wenn wie den Vogel zunähen.
–
You fix them with a simple straight stitch and start and end with some distance to the fabric seam.

—————————————————————————————————————————-
Klapp die Flügel um und fixiere sie jeweils mit einer Nadel – allerdings von Innen, damit Du die Nadel später problemlos wieder entfernen kannst.
–
Fold the wings and fix them with a needle – but from the inside so you will be able to sew the two bird body parts together and pull out the needles afterwards.


—————————————————————————————————————————-
Versäubere den unteren Teil des Vogels mit einer Zickzacknaht, damit Du den Vogel hier später mit der Hand verschließen kannst und nichts ausfranst.
–
Neaten the bottom of the bird with a zigzag stitch – this is where we will close the bird by hand later.

—————————————————————————————————————————-
Näh das Vöglein zusammen, schnippel die Spitze des Schwänzchens und des Schnabels ab, dann kann man es besser wenden.
–
Sew the birdie together (and be glad – it’s almost finished :-) ), cut the rump and the beak so you will be able to turn them inside out better.

—————————————————————————————————————————-
Und nun wenden (und wie immer finde ich, dass man hierfür am besten ein asiatisches Eßstäbchen verwendet) und den Vogel mit Füllwatte (gibt’s in jedem Bastelladen) füllen.
–
Now: Turn inside out (and as usual I use a chopstick to do this) and fill the birdie with wadding.

—————————————————————————————————————————-
Mit dem Matratzenstich zunähen…
–
Close the bird with the mattress stitch…
 —————————————————————————————————————————-
Und das war’s :-)
–
And that’s it :-)


Ende der Woche gibt es übrigens dann endlich die von Euch gewünschte Schnittanleitung für die Füchse zu kaufen – in männlicher und weiblicher Ausführung.
–
At the end of the week the tutorial for the foxes (female and male version) will be finished and you can find it at my shop.
lovely chicken, nice decoration
It’s very kind – thank you for sharing !
Danke für die süße Anleitung
[…] beginnt, es ginge sich noch aus …. in diesem Sinn: ganz schönes basteliges Wochenende! Vogerlanleitung hier Wolkenanleitung hier Schlagwörternetter Blog, Selbermachen, viel […]